23.12.12 Christmas Dinner Winner

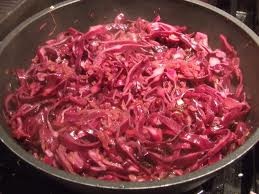
This year’s Christmas meal was doomed from the outset. Seeing how much effort my mother puts in every year, I declared last year that I would take up the mantle this December 25th and would cook the traditional roast dinner. And now, quite frankly, I am bricking it!! That means that to be on top of things I have to get a head start, as a result I am going to prep a few things in advance. The first one up is the red cabbage that my family is partial to. The only problem is that I don’t actually have a recipe to stick to. I know the gist of what’s in it, but I will have to dig into the BBC Food directory to teach me how to get it done.

Ingredients

50g/2oz butter
1 medium onion, finely sliced
2 dessert apples, peeled, cored and sliced
1kg/2¼lb red cabbage, finely sliced
100g/4oz sultanas or raisins
200ml/7fl oz sherry vinegar
salt and freshly ground pepper

20121223-200553.jpg

Preparation method

Melt the butter in a stainless steel or flameproof casserole over a medium heat (an aluminium pan will not work for this).
Fry the onion in the butter for three minutes, then add the apple and cabbage.
Cook for five minutes or so, until softened, then add the sultanas and the sherry vinegar.
Place a lid on the pan and cook for one hour, until all the vegetables are just tender.
Season to taste with salt and freshly ground black pepper and replace the lid. Continue to cook until the cabbage is tender and all the liquid has evaporated. This dish will keep for several days, covered, in the fridge. Simply heat it up again when ready to serve.

I’m off to heat my pan, cross my heart and hope that this meal all goes to plan. After all, there’s only Christmas riding on it.

DC

26.9.12 Bake Mistake

I’m a man who spends many of his days looking forward to his next meal, sometimes it’s what gets me through the tough hours. There are few more disappointing things, however, than having something in mind for dinner and then, upon making it, it proceeds to completely let you down. This problem reared its ugly head again today. After a few hours of both Lucy and myself hankering after something cheesy, we decided to use some courgettes and leeks to make a cheesy vegetable back along with some grilled chicken and salad. If we were both honest it was the main thing we were looking forward to about the meal. Unfortunately, when the cheesy dish came out of the oven it was underwhelming to say the least – It just wasn’t the answer we had both been looking for. To make matters worse, it was me who had made it, and as such it was only my own sword to fall on for the disappointment.

Knowing that I cannot let this atrocity happen again, I was forced to make today’s learning a desperate attempt to find a recipe that would have satiated both of our vegetable and cheese desires. Luckily, Nick Nairn of Ready Steady Cook fame is on hand to suggest the following recipe for a vegetable gratin (largely courgette):

Ingredients

· 200ml/7fl oz double cream

· 70g/2½oz parmesan, grated

· 1 tbsp olive oil

· ½ aubergine, chopped

· ½ yellow courgette, chopped

· 1 tomato, chopped

20121023-092732.jpg

Preparation method

1. Preheat the oven to 180C/350F/Gas 4.

2. Place the cream and all but two tablespoons of the parmesan into a small saucepan and heat gently. Simmer, stirring frequently, until the cheese has melted.

3. Heat the olive oil in a frying pan, add the aubergine and courgette and gently fry for 2-3 minutes. Add the tomato and stir, then spoon the mixture into a small ovenproof dish. Pour over the cheese sauce and sprinkle over the remaining parmesan.

4. Transfer to the oven and bake for 10-12 minutes, or until golden-brown. Serve in the ovenproof dish.

Next time my desire for cheesy, delicious, unhealthy vegetables will be satiated and I will get the treat that my cravings desire.

DC

5.9.12 Stew a Little

I’ll admit it, I have been watching some truly awful television as of late. I don’t know whether September is a programming grave yard because everyone is waiting to release things in autumn or Christmas time, but there is nothing on at the moment to relax in front of after a hard days work. All of this lead me to watching some ludicrous contest where two small market stall food producers get a chance to produce home made ready meals in the hope of getting a contract to mass produce them. It’s a bit like an even worse version of Dragon’s Den.

Although not a great show, it did appeal to my enjoyment of cooking. In particular, one of the teams was from Nigeria, a country who’s cuisine I’m not too familiar with, and produced what looked like an amazing black eyed bean stew. So I thought I would find and learn a recipe for such a dish. The below is courtesy of whats4eats.com:

Ewa Dodo black eyed bean stew with plantain

Ingredients
Black-eyed peas — 2 cups
Oil — 2 or 3 tablespoons
Onion, finely chopped — 1
Chile peppers, minced — 2 or 3
Tomatoes, seeded and chopped — 2 cups
Fish fillets, cut into 1-inch pieces (optional) — 1 pound
Salt and pepper — to taste
Oil for frying
Green plantains, peeled and cut into 1/2-inch rounds — 3

Method
– Rinse the black-eyed peas, and then soak them in enough water to cover by about 2 inches for 8 hours or overnight.

– Drain and rinse the soaked peas and add them to a large saucepan with enough water to cover by about an inch. Bring to a boil and simmer for 1 1/2 to 2 hours, or until the beans are just cooked through and tender. Add water as necessary to keep the beans covered.

– Heat the oil in a large pot over medium-high flame. Add the onion and chopped chile peppers and saute until the onion is cooked through and translucent.

– Stir in the chopped tomatoes and simmer for 3 or 4 minutes to cook them down a bit.

– Add the black-eyed peas and their liquid to the pot and bring to a boil. Stir in the fish, salt and pepper, reduce heat to low and simmer for about 10 minutes, or until the fish is cooked through.

– Adjust seasoning and set aside while you make the dodo.

– Heat about 1/4 inch of oil in a large skillet over medium flame. Fry the plantain rounds in batches, lightly browning them on each side. Remove to a paper towel-lined plate as they are done.

– Serve the ewa stew with the fried dodo on the side.

Give it a go… You might surprise yourself.

DC

9.6.12 A Cracking Pre-Game

If there’s one thing that I love before a big game it’s storing up on fuel. A night-before-a-game meal is a mighty fine thing. My love of far eastern food has been discussed with recipes for Pad Thai and Massaman curry already covered and as a result, when discussing potential takeaways to have on a lazy Saturday night, my mind immediately turned to Thai. It’s the perfect combination of things, there’s spicy and sharp, there’s carbohydrate heavy noodles, nice big pieces of meat and of course coconut milk gives it all that feeling of comfort food.

So we ordered Pad Thai, Kao Soi and a Panang curry but all of this wouldn’t be complete without something crunchy to dip and scoop with. So we ordered a nice big bag of spicy Thai prawn crackers. As we sat preparing to attack the meal, however, we were both left wondering one thing. You see, due to an intolerance, we wanted to know whether prawn crackers contain wheat. Neither of us, we decided, had the slightest idea how they were made.

Due to my love of blogging and my lack of prawn cracker making knowledge, I will defer to another blog Hunger Hunger for Kwan Aunty’s Prawn Crackers:

Ingredients
600g small prawns (flesh only & de-veined)
600g tapioca starch/flour*
1 heaped t salt
1 t white ground pepper
1/2 level t (or reduce slightly) msg
banana leaves to line steamer

20120623-095102.jpg

Method
1. The prawns needn’t be drained dry. Just wash and put into a machine to mince. Mince the prawns in the machine until fine.

2. Put the prawn mince into your cake mixer, add all the other ingredients and mix using the dough hook for 8 minutes or so. If mixture doesn’t come together, add 1/2 T of water. If too soft, add a little bit more tapioca flour.

3. Taste the raw dough. If it’s bland, add more seasoning. Remember that after frying, the crackers will taste even less salty. Now put the dough on a clean surface and knead with your hands until dough is very smooth (say 10 minutes) and when you press it with your fingers, it feels like pressing your arm (provided your arm isn’t more than 60 years old). Soft yet firm. If dough is hard, wet your hands and knead again. If your dough is too hard/dry, the crackers will have cracks after drying in the sun and they’ll taste very dry after frying.

4. Shape dough into two long rolls, pressing and slapping both ends to compact the rolls so there aren’t any air bubbles. Lay the rolls on the banana leaf (NO need to oil/grease) which is laid over your steamer in which the water should be boiling. If you can’t find banana leaf, just use foil but it won’t give that wonderful aroma as it cooks.

5. Steam at medium high (too high and dough will crack) heat for 1 hour 15 minutes or 1 hour if rolls are thinner.Make sure there is a vent in your steamer lid (a bamboo steamer & lid is best) so that the steam does not rise and fall onto the rolls, making the surface bubbled and wet.

6. When rolls are cool, wrap them in tea towels or foil and leave in fridge to firm up. I leave them overnight. The next morning, take rolls out and leave them out 1/2 hour to come to room temperature. Now we come to the part that’s hardest for me. Using a mandoline slicer (I don’t handle the mandoline well so I take the longer way and slice the rolls with a very sharp knife), cut into thin slices (too thick and they won’t puff so well) and lay them on metal sheets/trays to dry directly in the sun. In our tropical sun, it takes two days of drying before the crackers can be fried.

7. Deep-frying crackers

So there we have a reasonably lengthy and in depth recipe and way of making prawn crackers. I bet they’re delicious but it does seem an awful faff. I must concede that I don’t think that I’ll be making them anytime soon. The important learning here is that they are actually made of tapioca flour and as a result, you can eat them even if you are wheat intolerant – So enjoy!

DC

7.6.12 Great British Learnings

Every year I go through the same experience. “oh it’s too contrived nowadays”, “the actual event isn’t as important” – these are the things I tell myself. And every year, in much the same way as the X Factor manages to lure me back in, so does The Great British Menu. Maybe it’s my well documented love of cooking, maybe it’s the intrigue of seeing different ingredients and style of cooking or maybe it’s just that it’s on around dinner time and makes me hungry. Whatever the reason, it always manages to reel me in.

The competition takes the form of famous chefs cooking in regional heats for a place in the final before the 3 judges assign one chef to cook the starter, one the fish course, one the main and one the dessert at a celebratory banquet – this year for the Olympics. The chefs all battle to gain one over on each other, constantly trading barbs and comparing techniques and the “locality” of their ingredients sourcing. Every year, however, they appear to succeed as there are always more than a few head-scratching ingredients that make you pause for thought. This year one immediately leapt out at me – I’ve definitely never eaten a nasturtium!

It turns out that a nasturtium can have two forms. The most obvious is a small plant that is a genus of the Brassicaceae or cabbage family (I know, that name is awfully Game of Thrones isn’t it?). A commonly know ‘brand’ of nasturtium is watercress which explains its links to cooking!

However the type used on the show was actually the more flower like Tropaeolum which is a garden plant originating from South American. The brightly coloured flowers are common stead in gardens however, they are seen as food to pest such as moths and larvae. They are named similarly to the nasturtium that derives from the Brassicaceae family as they produce a similar oil, meaning that they can be used in salads etc to not only provide a peppery taste similar to watercress but they also provide a lovely sprig of colour!

The expanding use of unusual ingredients in cooking is incredible and the links between different, non-related plants and flowers is incredible. Whoever knew cooking would provide quite so many interesting learnings!

DC

10.5.12 Plancha Answer

Someone once told me that short is sweet – although that might have been Jim explaining away his height to a lady! So today were going to give it a go. You see the most interesting thing I learnt today is, in fact, a mere nugget of information, but a revaluation none the less.

When eating out at Italian restaurants, or indeed buying a lasagne from Waitrose, we’re often convinced to spend more buy the seller adding ‘al forno to the end. After all a lasagne al forno has to be more expensive that a normal lasagne, right? Much like my rant regarding the word artisan, I feel like this merely drives up prices by trying to make the product seem authentic and rustic.

20120521-172303.jpg

I felt exactly the same way regarding the Spanish menu classic a la plancha. That it merely was an over elaborate way of saying grilled. However, a Spanish television chef taught me differently. A la plancha means that the item has been cooked on a plancha but his is typically a heat source – be it pan or grill etc – scattered in rock salt so that he food sits atop the salt and cooks through the salt.

So now next time you or I have “gambas a la plancha” we’ll know exactly how they achieved that delicious taste. Short, but definitely sweet!

DC

25.4.12 What’s the Massa, Man?

My love of cooking has been covered previously and even my enjoyment of Thai food has been subject to review. Indeed it was another reason in the long list of reasons why I wanted to visit Thailand. So it would have been remiss to sit for 9 days and enjoy amazing plates of Pad Thai, green curry and Massaman curry without learning a little along the way.

It was with this that we set out on a cooking course in the middle of Koh Samui, learning how to make several dishes with an authentic Thai flair. Once I got past standing in front of a hot stove in 35 degree heat, the experience was incredible. 5 courses cooked in total: a spicy prawn noodle salad; a green papaya salad; a Thai green curry; a Massaman curry; and pumpkin in coconut milk as dessert. All simple enough to produce, but absolutely incredible, fresh and packed with flavour for a real taste of the Far East.

Before I went out to Thailand I had tried both Thai green curry and, a particular favourite, Panang curry but had never really tried a Massaman curry. During the previous night’s dinner at the Library (a hotel complete with red swimming pool!), I had the joy of experiencing one made with Ox cheek – one of my favourite meets. Apparently the dish is South Thai in origin with strong Muslim routes (and as a result not traditionally made with pork!)

20120507-220502.jpg

The recipe I learnt for this glorious, rich curry was:

– To start you need to make the curry paste by blending together: 12 rehydrated dried chilies, 4tbsp of shallot, 5 cloves of garlic, 1 stalk of lemon grass, 2tbsp fresh galangal, 1tsp cumin, 1 tsp coriander seeds, 2 cloves, 6 peppercorns (dry fry the spices), 1tsp shrimp paste, 1tsp salt, 1tsp sugar and a little veg oil.

– Pour 2 1/2 cups of coconut milk into a large pan and bring to the boil. Add 1 1/2lb of chunked beef and cook over a medium heat for 40 mins.

– Put the coconut cream in a separate pan and heat until it starts to separate and then add in the Massaman curry paste and cook until one sauce.

– Return the meat to the own and heat for further 4-5 mins.

– Stir in 2tbsp of fish sauce, a cinnamon stick, 6 green cardamom pods, 4tbsp of tamarind sauce, 1 large chunked up potato and 1 onion cut into wedges.

– Finish with a scattering of crushed peanuts.

And there you have it! I have learnt how to make a delicious new curry, that’s rich, creamy and spicy. Perfect for a nice winter time warmer.

DC

8.2.12 All Mashed Up

Gone are the famished, healthy, carb-banishing days of the January health kick, replaced instead with the bodies insistence that, it’s cold and I need some winters fare. Throughout January I avoided pasta, potatoes, didn’t have too much bread, in short carbs were low on the list of things I could eat. I felt great but oh did I hanker for a bowl of tomato pasta or bowl of chips or something like sausage and mash with a nice hot gravy.

But now we’re into February and all foods are now back in play. As it turns out it couldn’t have come at a better time. Whilst I lay on them sofa Wednesday night nursing my tired and sore head from a few too many late nights, I watched How to Cook Like Heston and this week’s topic was potatoes! In the series Heston aims to show home cooks how to make the most out of everyday ingredients and, as I lay there hankering for some hot gravy with some sort of potato, he proceeded to show the best way to make the perfect mashed potato.

20120212-161543.jpg

The potato is a crop that stores a large quantity of starch within it’s cells. With China, India and Russia leading the worlds production 330 million tons were produced in 2009 and the UN declared 2008 to be the year of the potato to increase their consumption in the third world. Although typically criticised for being high on the GI index they have numerous benefits such as Vitamin C, Potassium and Fibre. Heston claims that the high starch content is key to getting a really rich and creamy mash so the key is two fold – first, pick the right potato, which he suggests is a smaller waxy potato. Secondly, cook it in such a way that you don’t lose all of the starch from the potatoes cells.

So to make the best mashed potato:

1. Rinse the potatoes for 5 minutes in cold water to remove excess starch from cutting them up.

2. Boil in unsalted water at 72 degrees C for 30 minutes.

3. Drain in a colander with cold waters.

4. Boil again in fresh, salted water until they’re falling apart.

5. Infuse some milk with the skins of the potatoes and leave to stand for 20 mins before straining.

6. Drain the potatoes and then dry them out by leaving them over a low heat.

7. Then rice the potatoes, mix with 25% of their weights worth of butter. The sieve the mixture to make extra smooth.

20120212-161323.jpg

And there you have it, the perfect mash (although he does suggest that if you’d like to be especially decadent you can up the butter content). So today I learnt how to get over the healthy January by making the perfect, buttery mashed potato (I’ll avoid the lime jelly). Now if you’ll excuse me, I have some carbs to catch up on.

DC

4.2.12 Many Ways to Skin a Cat….

…..but apparently only one way to fillet a fish like mackerel. I should explain, I love fish. All types, from seafood like prawns and squid to nice white fish like cod and sea bass. I like it fried, baked, breaded and in a stew. I love cooking it myself but that comes with a huge but – I’m scared to death of filleting a whole fish. I just don’t even know where to begin.

Luckily as I was watching Saturday Kitchen whilst doing my Saturday cardio at the gym, housewife’s favourite James Martin, explained to me why I should fear no more and even had the courtesy to use one of my favourite fish – Mackerel.

20120205-155716.jpg

1. The first step is to identify a nice fresh fish. It shouldn’t smell, the eyes should be bright and shiny, and when you hold it up it should have minimal bend. These are all great indicators of a lovely fresh fish.

2. Take a filleting knife, you’ll know if it is a filleting knife as it flex and bend, this allows it to follow the line of the bones better.

3. Raise the front fin (behind the gills), and make an incision down towards the spine.

4. When you feel the knife reach bone, turn it to face towards the tail, place the flat of your palm against the fish and gently run the knife down the bone to the tail. Angle the knife slightly into the bone to ensure that you’re getting all of the flesh off.

5. Take the fillet off and trim the bits of skin etc around the edges of the fillet.

6. Take some tweezers and run them down the centre of the flesh-side of the fillet and pluck out the pin bones.

And there you have your fillet! Repeat on the other side. It’s as easy as that. If your someone who finds it easier to follow by watching the BBC have a master class on it here.

Today I learnt how to fillet a mackerel (or any similar fish). Go on give it a go!!

DC